DEPRECATED > How to install the OpenOCD binaries?
Contents |
Deprecation notice
In mid-2019, the OpenOCD binaries were moved from the GNU MCU Eclipse project to the xPack project. The new install page is:
All previous releases are still available in the @gnu-mcu-eclipse scope,
but were deprecated and are not recommended for new projects.
Overview
OpenOCD is an open source project hosted on SourceForge, and project maintainers insist that all end-users should compile it from the latest version of the source code available from their repository. There are no special stable branches or tags and there are no clear release dates for future versions. On Windows you need to install MSYS2 and use the appropriate package build procedure.
If you are not interested in building from sources, and appreciate a better integration with the Eclipse plug-in, please feel free to use the GNU MCU Eclipse OpenOCD binaries, and preferably install them in the default locations.
Warning: OpenOCD is a very complex project, capable of working with many JTAG probes, but support for them must be explicitly included at build time, so be sure that support for your JTAG probe was included in the binaries you plan to use. The GNU MCU Eclipse OpenOCD includes support for most existing probes.
J-Link conversion
If the only reason to run OpenOCD is to use the ST-LINK on-board programmer on STM Discovery or Nucleo boards, then, thanks to SEGGER, a better solution exists: it is possible to upgrade the on-board programmer firmware to behave like a J-Link lite, and then use the GNU MCU Eclipse J-Link plug-in. The conversion is reversible, you can return the board to ST-LINK at any time.
Please follow the instructions on Converting ST-LINK on-board into a J-Link.
The xPack install
This method uses the portable tool xpm, the xPack Package Manager, and can be used on Windows, macOS and GNU/Linux.
$ xpm install --global @gnu-mcu-eclipse/openocd
This will always install the latest available version, in the central xPacks repository, which is a platform dependent folder:
- Windows:
%APPDATA%\xPacks(likeC:\Users\ilg\AppData\Roaming\xPacks) - macOS:
${HOME}/Library/xPacks - GNU/Linux:
${HOME}/opt/xPacks
Note: This location is configurable using the environment variable
XPACKS_REPO_FOLDER; for more details please check the
xpm folders page.
The actual binaries are extracted from the distribution archive in a
folder named .content, located in the versioned xPack folder. On some
platforms, dotted files are hidden by default, so the file explorer might
require additional settings to make them visible.
Windows antivirus warning: aggressive antiviruses may prevent xpm to install binary xPacks; see FAQ
Manual install
The all platforms, GNU MCU Eclipse OpenOCD is released as a portable archive that can be installed in any location.
The archives can be downloaded from GitHub Releases page.
Note: For manual installs, the recommended install location is different from the xPack install folder.
Windows
The Windows versions of GNU MCU Eclipse OpenOCD are packed as ZIP files. Download the latest version named like:
gnu-mcu-eclipse-openocd-0.10.0-6-20180112-1448-win64.zipgnu-mcu-eclipse-openocd-0.10.0-6-20180112-1448-win32.zip
Select the -win64 file for Windows x64 machines and the -win32 file for Windows x32 machines.
Unpack the archive and copy it into the %userprofile%\AppData\Roaming\GNU MCU Eclipse (for example C:\Users\ilg\AppData\Roaming\GNU MCU Eclipse) folder; according to Microsoft, this is the recommended location for installing user specific packages;
Note: although perfectly possible to install OpenOCD in any folder, it is highly recommended to use this path, since by default the plug-in searches for the executable in this location.
The result is a structure like:
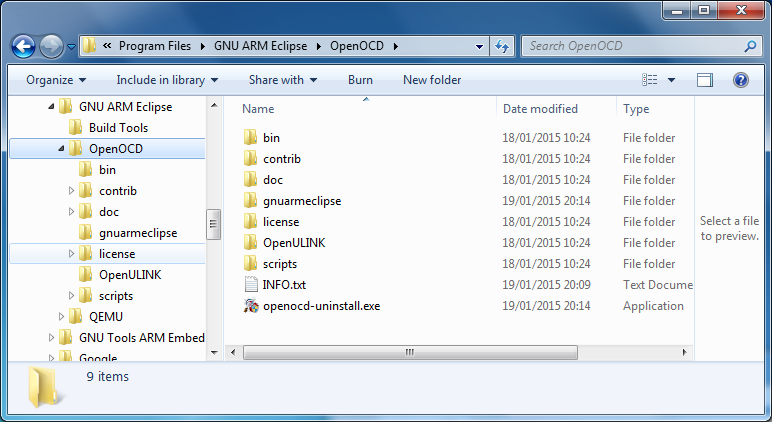
To check if OpenOCD starts, use the following command:
C:>"C:\Users\ilg\AppData\Roaming\GNU MCU Eclipse\OpenOCD\0.10.0-5-20171110-1117\bin\openocd" --version
GNU MCU Eclipse 64-bit Open On-Chip Debugger 0.10.0+dev-00254-g2ec04e4e (2017-11-10-13:20)
Drivers
As usual on Windows, mastering drivers is a challenge and OpenOCD is no exceptions, so don’t be surprised to encounter many incompatible drivers for various JTAG probes. The OpenOCD distribution includes some libusb drivers, and recommends to run the zadig.exe tool to activate them. Although this manoeuvre will make OpenOCD happy, it will most probably ruin other USB drivers you might have installed. Our strong recommendation is to NOT do this, and instead use the manufacturer drivers, when compatible with OpenOCD.
ST-LINK/V2
One example of compatible drivers are the ST-LINK/V2 USB drivers, from ST, available as part number STSW-LINK009. Download the stsw-link009.zip archive, extract its content to a separate folder, and run the dpinst_amd64.exe (or dpinst_x86.exe) with administrative privileges.
As for most Windows drivers, to complete the installation, a restart usually helps.
Connect the ST-LINK/v2 or the DISCOVERY board and check in Control Panel → System → Device Manager if the JTAG is operational.
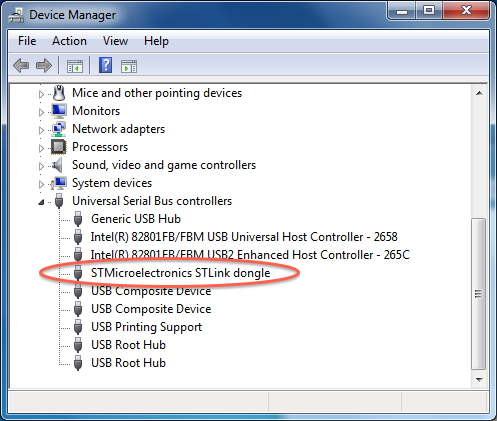
For other probes follow the manufacturer instructions.
Note 1: All Windows tests were performed on Windows 10. If, for any reasons, you still use older versions, especially the venerable Windows XP, some differences may be observed in the USB subsystem; to stay on the safe side, try to always use original manufacturer drivers.
Note 2: OpenOCD v0.7.0 does not work with the current J-Link drivers, so on Windows it is not possible to use OpenOCD with J-Link; use the SEGGER supplied software instead.
Zadig
For some devices, for example ARM-USB-OCD from Olimex, after installing the vendor drivers, you must also install Zadig and convert the vendor drivers to WinUSB drivers.
macOS
The macOS version of GNU MCU Eclipse OpenOCD is packed as a TGZ archive. Download the latest version named like:
-
gnu-mcu-eclipse-openocd-0.10.0-6-20180112-1448-osx.tgz
To install OpenOCD, unpack the archive and copy it to /${HOME}/opt/gnu-mcu-eclipse/openocd/:
$ mkdir -p ${HOME}/opt
$ cd ${HOME}/opt
$ tar xvf ~/Downloads/gnu-mcu-eclipse-openocd-0.10.0-5-20171110-1117-osx.tgz
$ chmod -R -w gnu-mcu-eclipse/openocd/0.10.0-5-20171110-1117
Note: although perfectly possible to install OpenOCD in any folder, it is highly recommended to use this path, since by default the plug-in searches for the executable in this location.
To check if OpenOCD starts, use:
$ ${HOME}/opt/gnu-mcu-eclipse/openocd/0.10.0-5-20171110-1117/bin/openocd --version
GNU MCU Eclipse 64-bit Open On-Chip Debugger 0.10.0+dev-00254-g2ec04e4e (2017-11-10-13:20)
GNU/Linux
The GNU/Linux versions of GNU MCU Eclipse OpenOCD are packed as TGZ archives. Download the latest version named like:
gnu-mcu-eclipse-openocd-0.10.0-6-20180112-1448-centos64.tgzgnu-mcu-eclipse-openocd-0.10.0-6-20180112-1448-centos32.tgz
As the name implies, these are CentOS tar.gz archives, but can be executed on most recent GNU/Linux distributions (they were tested on Debian, Ubuntu, Manjaro, SuSE and Fedora). Select the -centos64 file for 64-bit machines and the -centos32 file for 32-bit machines.
To install OpenOCD, unpack the archive and copy it to /${HOME}/opt/gnu-mcu-eclipse/openocd/${version}:
$ mkdir -p ${HOME}/opt
$ cd ${HOME}/opt
$ tar xvf ~/Downloads/gnu-mcu-eclipse-openocd-0.10.0-5-20171110-1117-debian64.tgz
$ chmod -R -w gnu-mcu-eclipse/openocd/0.10.0-5-20171110-1117
Note: although perfectly possible to install OpenOCD in any folder, it is highly recommended to use this path, since by default the plug-in searches for the executable in this location.
To check if OpenOCD starts and is recent, use:
$ ${HOME}/opt/gnu-mcu-eclipse/openocd/0.10.0-5-20171110-1117/bin/openocd --version
GNU MCU Eclipse 64-bit Open On-Chip Debugger 0.10.0+dev-00254-g2ec04e4e (2017-11-10-13:20)
UDEV
For the JTAG probes implemented as USB devices (actually most of them), the last installation step on GNU/Linux is to configure the UDEV subsystem. OpenOCD provides an UDEV rules file defining all the supported IDs; to install it, just copy the file to /etc/udev/rules.d and eventually notify the daemon:
$ sudo cp ${HOME}/opt/gnu-mcu-eclipse/openocd/0.10.0-5-20171110-1117/contrib/99-openocd.rules \
  /etc/udev/rules.d/
$ sudo udevadm control --reload-rules
Note: If you previously installed the J-Link binaries, the USB IDs were already added to UDEV. The above OpenOCD rules file also defines the J-Link ID. Apparently UDEV does not complain; if you encounter problems, just comment out the definition in the OpenOCD file.
USB access rights
On some GNU/Linux distributions, the UDEV definitions are not enough, or are not effective, and when trying to access the JTAG probe, an error is issued:
libusb_open failed: LIBUSB_ERROR_ACCESS
If this happens, first try to start openocd with sudo; if this works, for regular work you also need to grant your user permission to use the USB.
For example, on Ubuntu 15.10 you need to issue something like:
$ sudo usermod -aG plugdev $USER
Then restart and login again.
If you still have problems, check your distribution documentation and when you have a functional solution post it on the project forum.
Testing
To test if OpenOCD is able to connect to a specific board, you generally need to select the interface and the processor. As a shortcut, for some well known boards, there are ready made configuration files to set both the interface and the processor. For example, on macOS, to test a connection via ST/LINK v2 to the STM32F4DISCOERY board, you can use the sample below:
$ ${HOME}/opt/gnu-mcu-eclipse/openocd/0.8.0-201501181257/bin/openocd \
  -f board/stm32f4discovery.cfg
GNU MCU Eclipse 64-bit Open On-Chip Debugger 0.8.0-00036-gb7535dd (2015-01-18-12:57)
Licensed under GNU GPL v2
For bug reports, read

http://openocd.sourceforge.net/doc/doxygen/bugs.html

srst_only separate srst_nogate 	srst_open_drain connect_deassert_srst
Info : This adapter doesn't support configurable speed
Info : STLINK v2 JTAG v14 API v2 SWIM v0 VID 0x0483 PID 0x3748
Info : using stlink api v2
Info : Target voltage: 2.905638
Info : stm32f4x.cpu: hardware has 6 	breakpoints, 4 watchpoints
^C
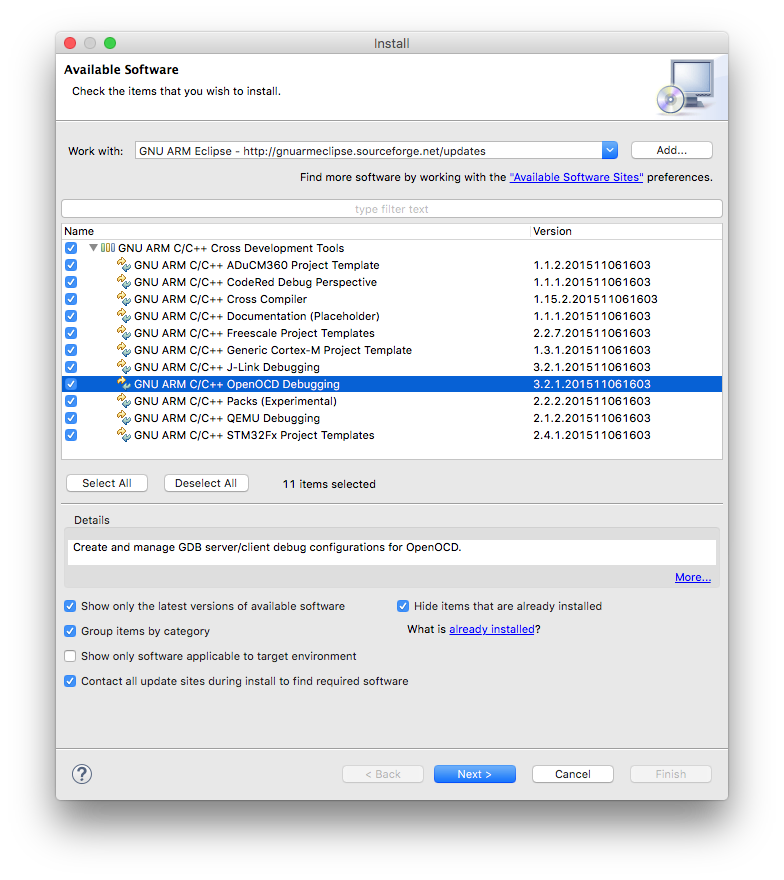
OpenOCD Debugging plug-ins
The OpenOCD debugging plug-ins are not included in these packages, and need to be installed as usual. Just be sure that the GNU MCU C/C++ OpenOCD Debugging plug-ins are selected.
Update OpenOCD path
Right after installing OpenOCD, or updating to a new version, it is necessary to inform Eclipse where the binaries were installed. If OpenOCD was installed in the default location, Eclipse has a mechanism to autodetect the most recent version, but this mechanism sometimes fails, and manual path setting is necessary.
To set the path, first exit Eclipse, and start it again, to allow the autodetect mechanism to give it a try.
-
in the Eclipse menu, go to (Window →) Preferences → MCU → Global OpenOCD Path
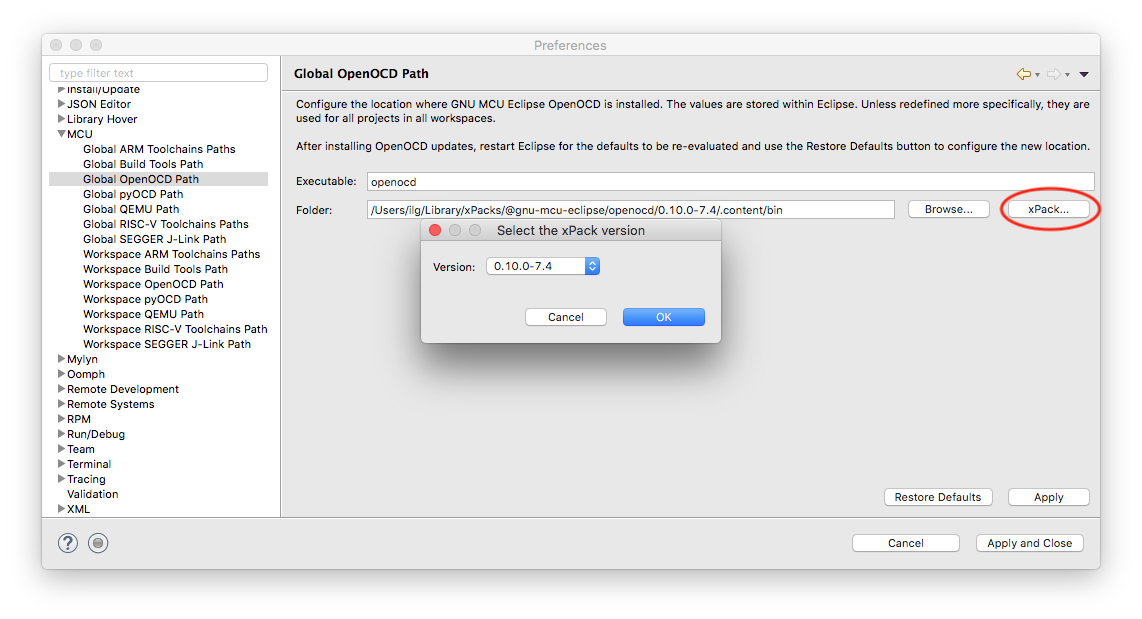
-
click the Restore Defaults button
For more details please refer to the OpenOCD plug-in page, where the entire procedure is explained.
Documentation
If you are using the GNU MCU Eclipse OpenOCD, the documentation is part of the installed package.
Slightly older version are also available in the Files section of the SourceForge project. For version 0.9.0, the manual is openocd.pdf.
