How to install the Eclipse Embedded CDT plug-ins
Contents |
Quicklinks
If you know what this is all about, you can do one of the following:
- use the Eclipse IDE for Embedded C/C++ Developers packages, which packs Eclipse with the plug-ins; for this go to Eclipse and download the binary for your platform;
- go to the Eclipse menu → Help → Eclipse Marketplace…, find Embedded CDT and install
If, for any reason, this does not work and you have to do it manually, you only need the update site details:
- name: Eclipse Embedded CDT Plug-ins
- URL:
https://download.eclipse.org/embed-cdt/updates/neon/
Note: as the name implies, this URL is only valid for Eclipse Neon or
later; the old URL http://gnuarmeclipse.sourceforge.net/updates/ is now
deprecated, and its content will point to v3.x, that can be used to install
the older versions of the plug-ins on older Eclipses.
It is recommended that you install the plug-ins after installing the ARM toolchain and/or the RISC-V toolchain, the build tools (on Windows), and the debugging binaries.
Important notes:
- if you use the Oracle JDK, starting with mid January 2017, attempts to install from SourceForge fail with handshake_error;
- if you are behind a firewall, older Java virtual machines fail to connect to SourceForge.
Prerequisites
Since these are Eclipse plug-ins, they obviously require a functional Eclipse CDT (Neon or later), which requires Java.
Win XP - a word of caution
For the old-timers, a word of caution about Windows XP: recent Java distributions (from 7 up) are no longer certified for XP, so, even if they might seem to work, you are on thin ice. If possible, avoid using XP at all; otherwise use only the 32-bit version, with 32-bit Java and Eclipse.
Win XP 64
The warning is even more important for Win XP 64, which, in certain configurations, has difficulties to start 32-bit applications (like the JLink GDB Server or OpenOCD). Although generally Win XP 64 is not recommended at all, if you really need to use it, preferably experiment with a 32-bit Java and a 32-bit Eclipse.
However please note that no support requests referring to Win XP 64 will be processed.
Java
The recommended package is the latest version from the official Oracle OpenJDK page. The OpenJDK Java used in Ubuntu is also fine. Starting with 2020, the minimum is JDK 11, or even JRE 11 (the Java Runtime Environment), but, as said before, better use the latest JDK. On macOS the last Apple Java implementation is 1.6, so it is required to use the Oracle version.
Important note: Java may be distributed in separate 32/64-bit packages. Unless you have older applications requiring 32-bit Java, on 64-bit systems it is recommended to install the 64-bit JDK. Anyway, Oracle JDK 9 might not even be available for 32-bit.
On some distributions, for example on Ubuntu 18.04 LTS, Java seems to be already installed in the standard distribution:
$ java -version
openjdk version "11.0.7" 2020-04-14
OpenJDK Runtime Environment (build 11.0.7+10-post-Ubuntu-2ubuntu218.04)
OpenJDK 64-Bit Server VM (build 11.0.7+10-post-Ubuntu-2ubuntu218.04, mixed mode, sharing)
On other distributions, you can install the OpenJDK run-time and test if it was properly installed with the following commands:
$ sudo apt-get -y install openjdk-11-jdk
$ java -version
openjdk version "11.0.7" 2020-04-14
OpenJDK Runtime Environment (build 11.0.7+10-post-Ubuntu-2ubuntu218.04)
OpenJDK 64-Bit Server VM (build 11.0.7+10-post-Ubuntu-2ubuntu218.04, mixed mode, sharing)
Java 11 notice: Starting with 2020, Eclipse requires Java 11; trying to update the plug-ins while using Java 8 is unsuccessful, sometimes without any message or warning.
If you are behind a firewall, older Java virtual machines fail to connect to SourceForge. Update your Java JDK to 11 or later and retry to install the plug-ins.
Java Cryptography Extension (JCE)
If you use the Oracle JDK, starting with mid January 2017, attempts to install via HTTPS from SourceForge might fail with handshake_error. Install the Java Cryptography Extension (JCE) Unlimited Strength Jurisdiction Policy Files and the installer should be able to reach the update site.
Eclipse & CDT
Starting with version 4.x, the oldest Eclipse supported by the plug-ins is Eclipse 4.6 Neon.3 (CDT 9.2), and the recommended version is 4.7 Oxygen. Do not try to install them on Mars, Luna, Kepler, Juno, Indigo, or older versions, since the install will fail.
The package way
The simple way is to download Eclipse IDE for Embedded C/C++ Developers from Eclipse and you get at once both Eclipse CDT and the Embedded CDT plug-ins.
Important note: there are different binaries for 32-bit (
_x86) and 64-bit (x86-64). Be sure the Eclipse binary word size matches the Java word size, otherwise the obscureJava was started but returned exit code=13message is issued.
On macOS, after un-archiving, remove the com.apple.quarantine extended attribute, otherwise the application will fail to start.
$ xattr -dr com.apple.quarantine Eclipse.app
The plug-ins install way
If you prefer to do this in more steps, go to the Eclipse packages and get the Eclipse IDE for C/C++ Developers archive appropriate for your platform, preferably the 64-bit version.
Links to older versions are available in the More Downloads section, at the bottom.
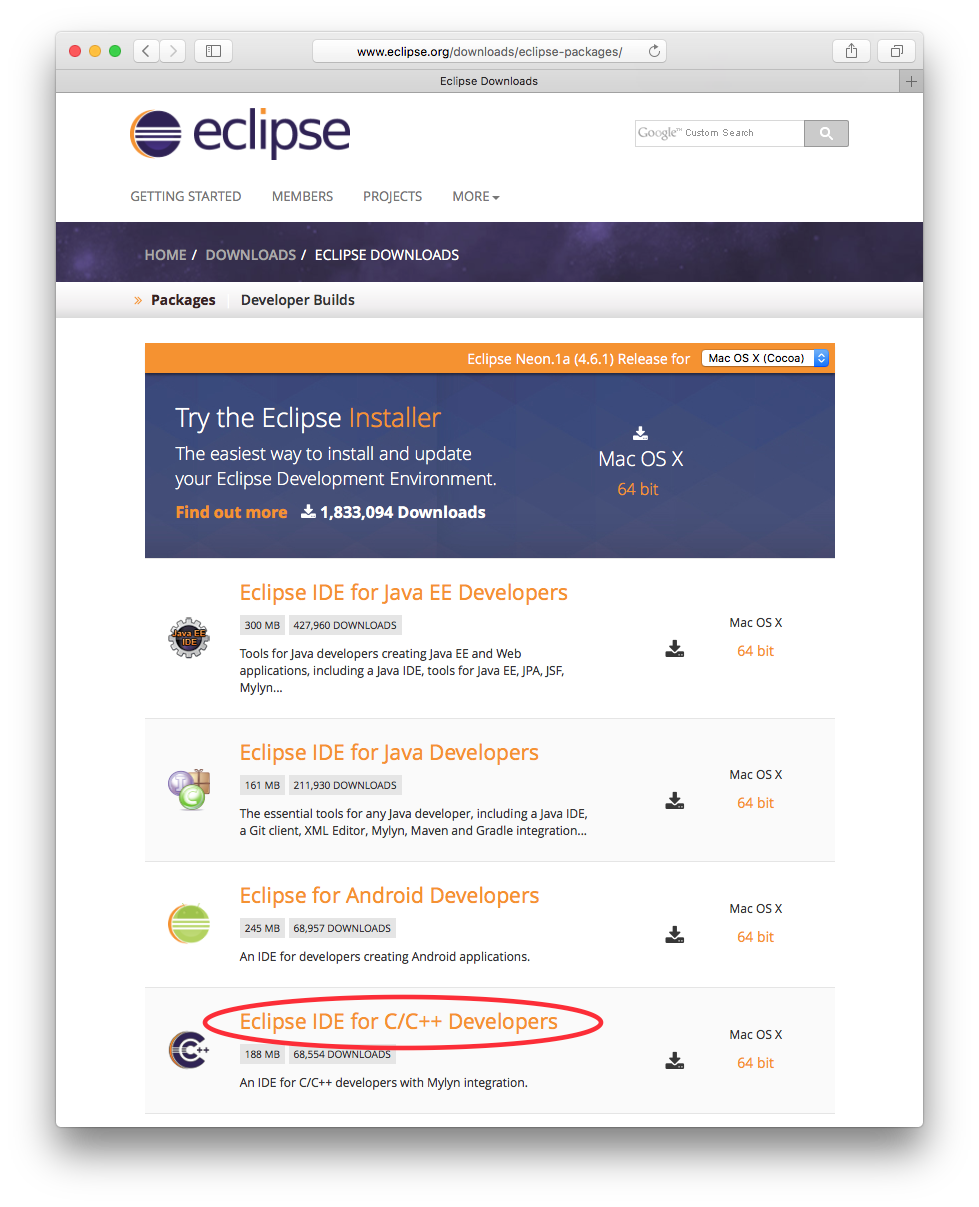
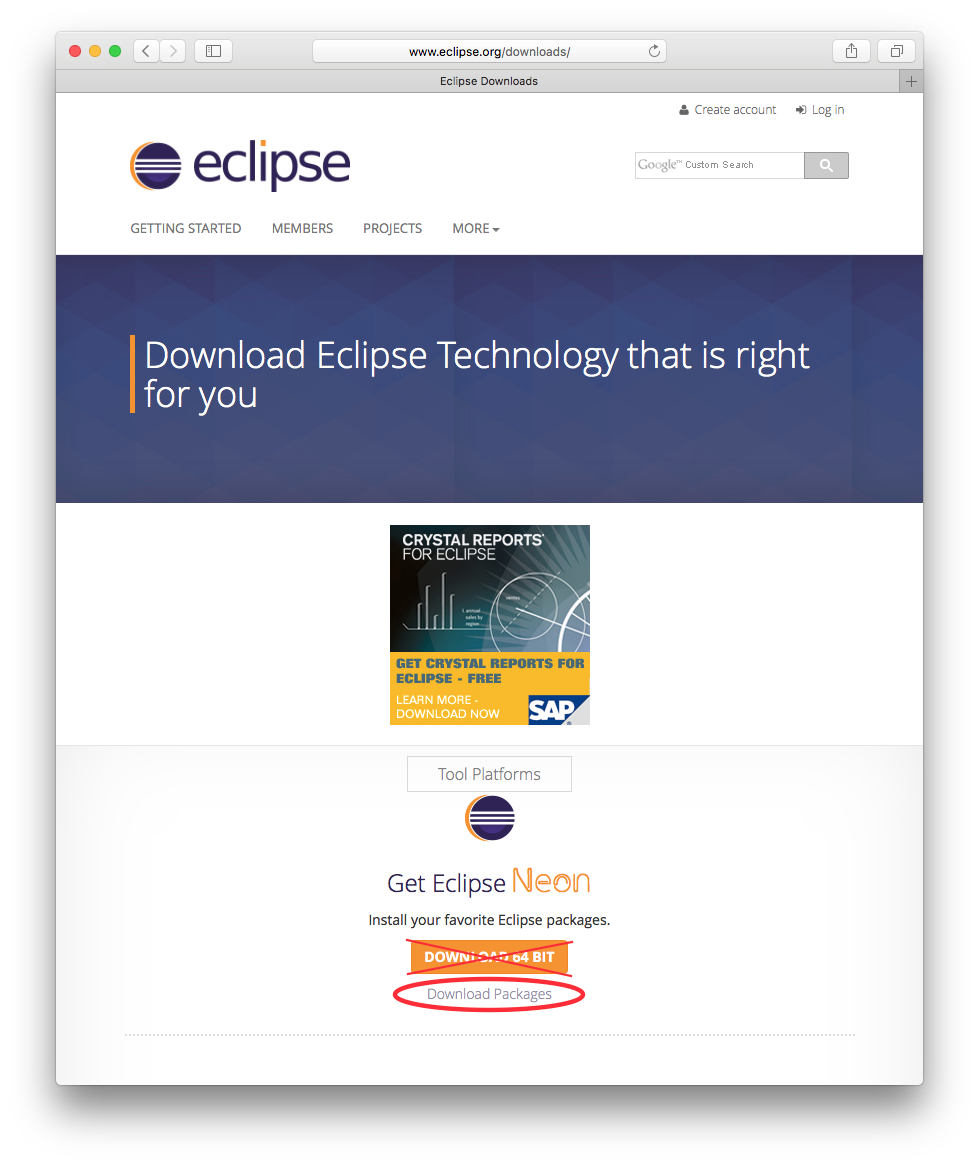
In case you reached the main Eclipse downloads page, avoid the recommended download and follow the link to the Eclipse packages.
Traditionally Eclipse does not need an installer, Eclipse is distributed as a plain archive. To install Eclipse, simply unpack the archive at a place of your choice and start using it.
Note 1: on GNU/Linux be sure you manually install the Eclipse; DO NOT try to install it via the Synaptics package manager, or similar, since usually you get an older version and the CDT plug-ins are not included.
Note 2: Contrary to other tools, Eclipse does not need administrative rights, does need not be installed in a system location, and does not need not be a single instance on a system. Actually you are encouraged to install multiple instances of Eclipse, possibly one for each project type, to avoid mixing plug-ins from different sources in case different project types.
CDT
The minimum CDT version is 9.2.1, that came with Eclipse Neon. Do not try to use earlier versions, since either the install will fail (with something like … requires ‘bundle org.eclipse.cdt 9.2.1’ but it could not be found), or it will not run properly.
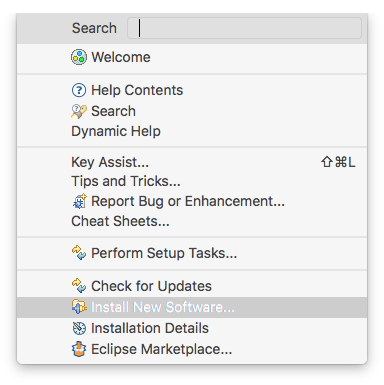
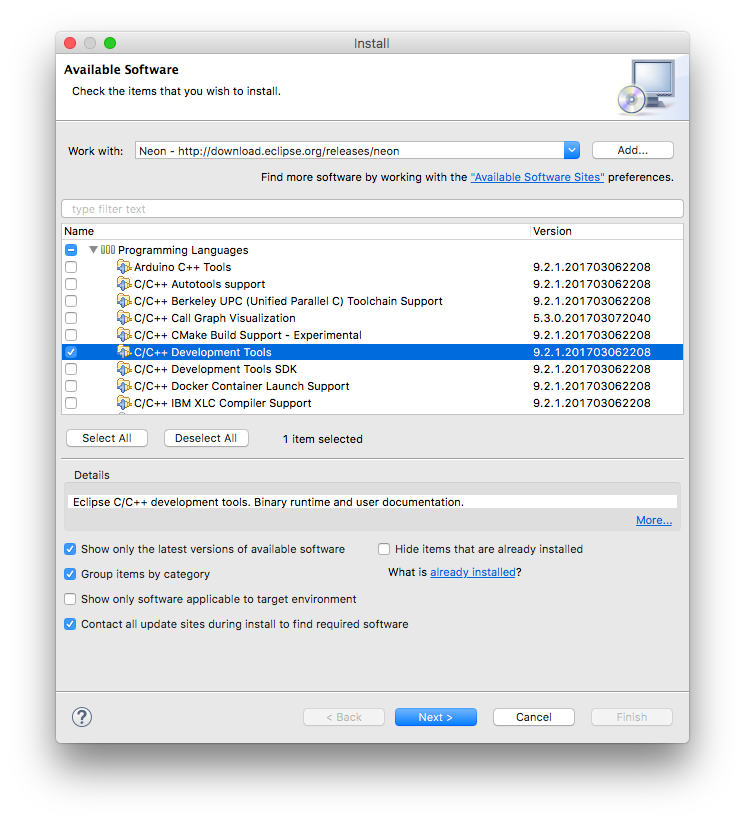
As mentioned before, the recommended way is to use a fresh Eclipse IDE for C/C++ Developers for the cross ARM development projects. Even if you did so, but especially if you did not do so, it is a good idea to check if you really have the latest version available. For this, enter the Eclipse menu and go to Help → Install New Software
- select Work with: Neon (or more recent)
- if the Group items by category is enabled, expand the Programming Languages group
- select the C/C++ Development Tools feature
- click the Next button and follow the usual installation procedure
Compatibility issues
Please note that starting with 4.x, compatibility with Eclipses previous than 4.6 Neon was no longer possible. If, for any reason, you need a solution for Eclipse Luna or Mars, you can try the GNU MCU Eclipse Plug-in version 3.*, but please keep in mind that this version is no longer maintained.
Similarly:
- starting with 3.1.x, compatibility with Eclipses previous than 4.4 Luna was no longer possible. If, for any reason, you need a solution for Eclipse Kepler, you can try the GNU ARM Eclipse Plug-in version 2.12, but please keep in mind that this version is no longer maintained.
- starting with 1.1.x, compatibility with Eclipses previous than 4.3 Kepler was no longer possible. If, for any reasons, you need a solution for older Eclipse versions, you can try the GNU ARM Eclipse Plug-in version 0.5.5, but please keep in mind that this old version is no longer maintained.
Plug-ins install/update
The following samples are from a slightly older Eclipse 4.3 Kepler on macOS. Other platforms may behave slightly different, but the idea is the same.
Warning: Be sure your Eclipse is 4.6 Neon.3 or later, otherwise the plug-ins will refuse to install, claiming Missing requirements and Cannot satisfy dependency.
Java 11 notice: Starting with 2020, Eclipse requires Java 11; trying to update the plug-ins while using Java 8 is unsuccessful, sometimes without any message or warning.
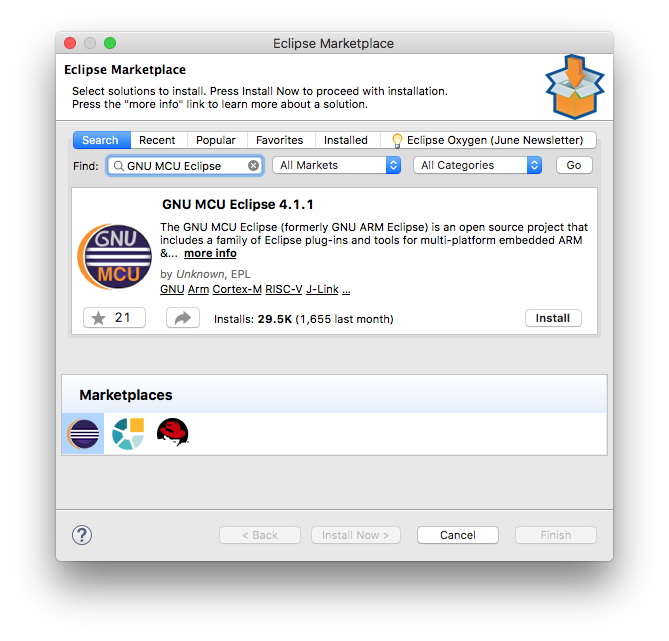
The Eclipse Marketplace way
The easiest way to install/update the plug-ins is to use the Eclipse Marketplace:
- go to the Eclipse menu → Help → Eclipse Marketplace…
- in the Find field, enter Eclipse Embedded CDT
- click the Go button
This should identify Eclipse Embedded CDT and offer to Install/Update/Uninstall
assets
The Eclipse update site way
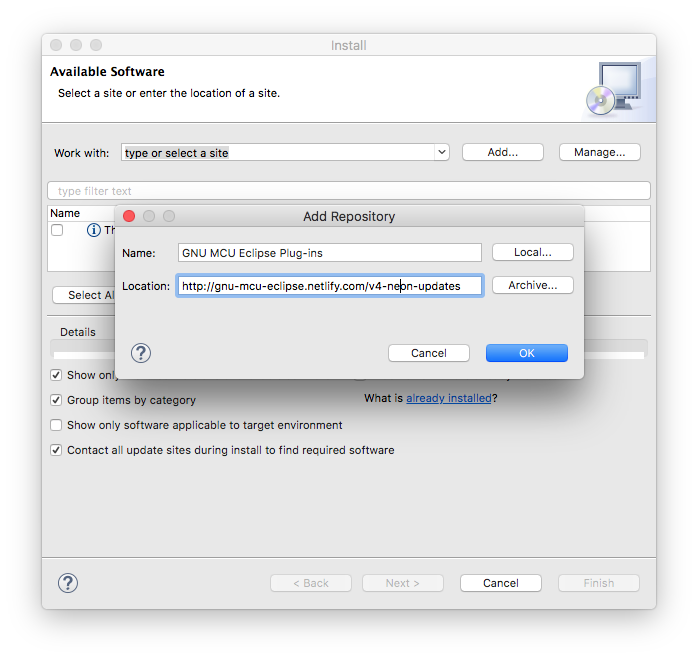
The classical way to install the Eclipse Embedded CDT plug-ins is to use the Eclipse standard install/update mechanism: In the Eclipse menu → Help → Install New Software…
- in the Install window, click the Add… button (on future updates, select the URL in the Work with: combo)
- fill in Name: with Eclipse Embedded CDT Plug-ins
- fill in Location: with https://download.eclipse.org/embed-cdt/updates/neon/
- click the OK button
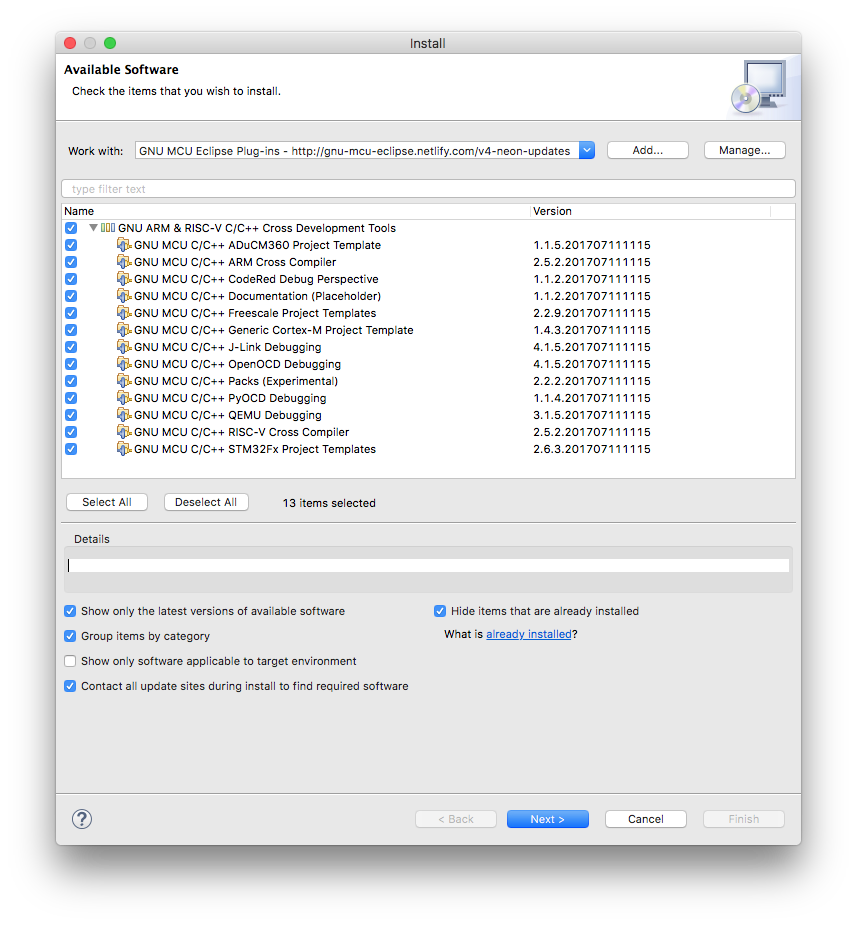
- normally the main window should list a group named GNU ARM & RISC-V Cross Development Tools; expand it
- (in case the main window will list There are no categorized items, you are probably using a very old version; disable the Group items by category option)
- select all the plug-ins (the one marked End of life is needed only for compatibility with previous version, normally can be safely skipped)
- click the Next button and follow the usual installation procedure
Once you define the update site URL, further updates are greatly simplified (Help → Check For Updates).
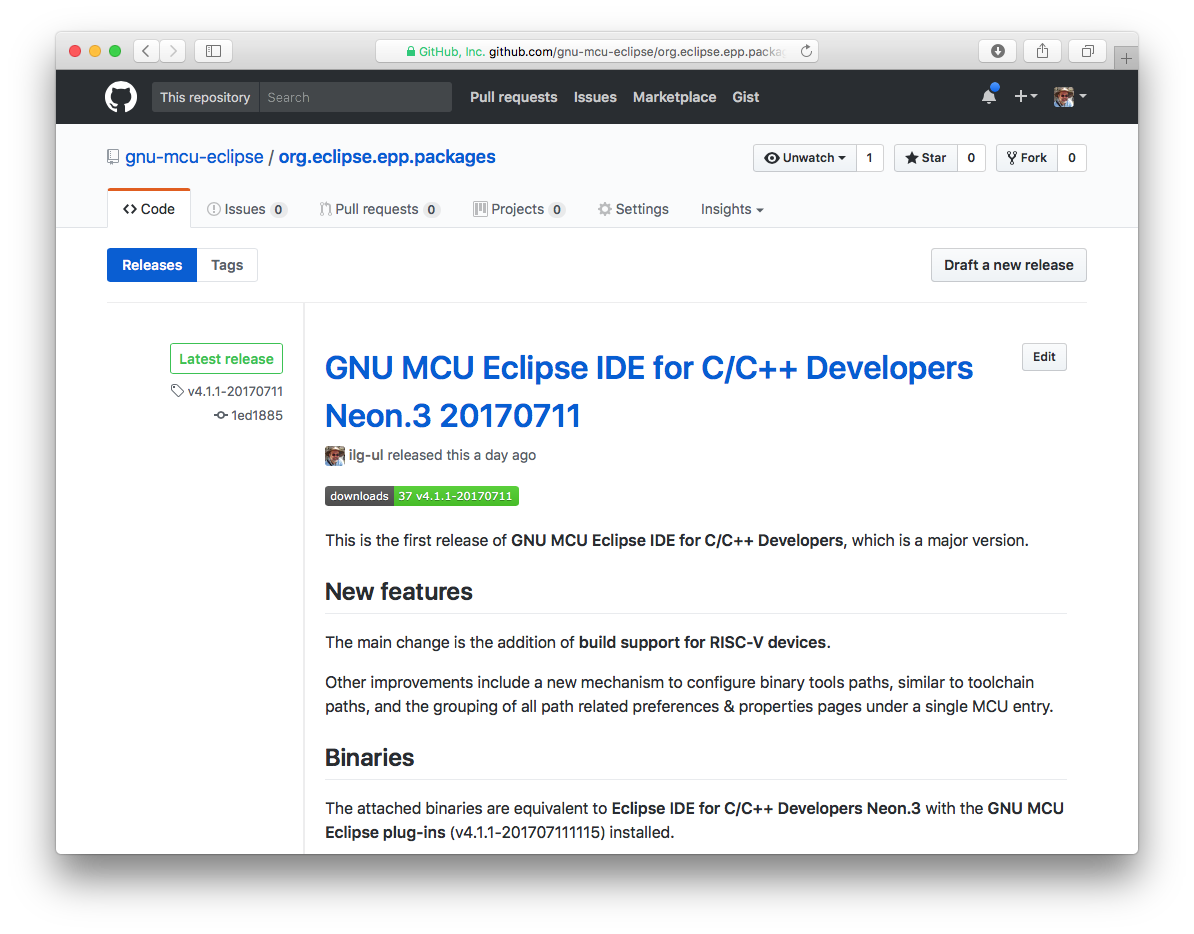
The local archive way
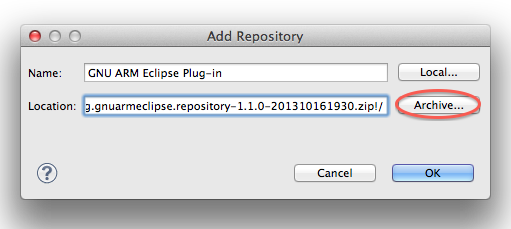
If, for any reason, you need to install a specific version of the plug-in, the solution is to download the archive from Eclipse servers; for releases pre v5.1.1 use GitHub Releases, or, for even older releases, from SourceForge Files and to point the Eclipse update mechanism to the local archive: In the Eclipse menu → Help → Install New Software…
- in the Install window, click the Add… button
- in the Add Repository window, click the Archive… button * in the Repository archive window, select the downloaded .zip archive * click the OK button
- click the OK button
- follow the usual installation procedure
Off-line install
If, for any reasons, you need to install the Eclipse Embedded CDT plug-ins on a system without permanent Internet connection, and decide for the alternate way presented above, please be aware that the debug plug-ins require the presence of the C/C++ GDB Hardware Debugging plug-in. Usually this plug-in is not included in the standard package, but is present in the CDT Optional Features category, packed with the CDT archives available from the CDT download site. Download the desired archive, add it to your update sites, select the C/C++ GDB Hardware Debugging plug-in, restart as usual, and then install the Eclipse Embedded CDT plug-ins from the local archive, as above.
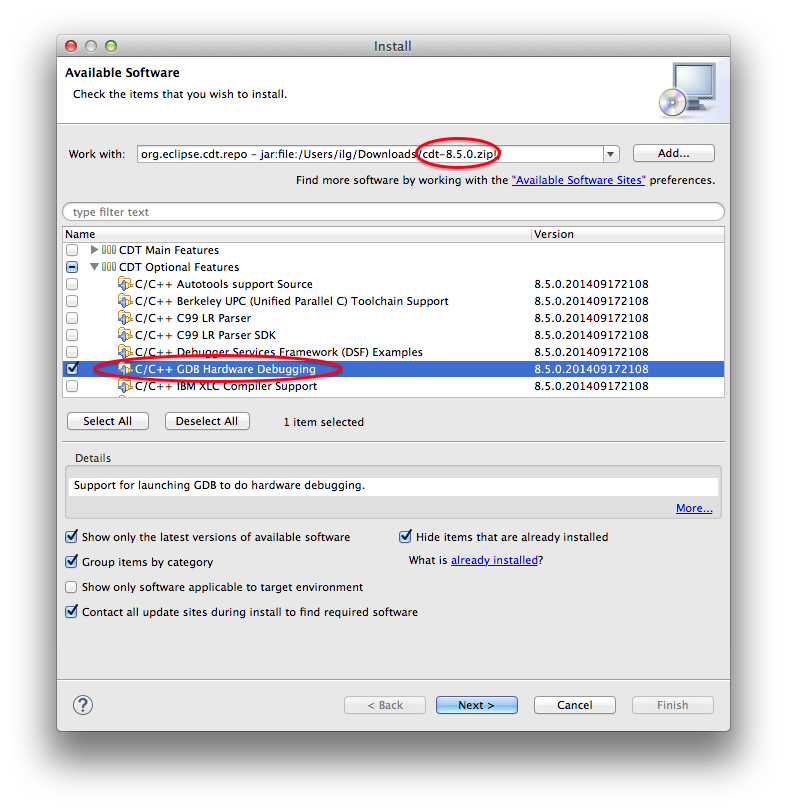
Note: Attempts to install the Eclipse Embedded CDT plug-ins off-line without having the C/C++ GDB Hardware Debugging installed fails with an error related to installing the ilg.gnumcueclipse.debug.gdbjtag.jlink.feature.group and other debugging features.
On-line install do not have this problem since the Eclipse automatically downloads the C/C++ GDB Hardware Debugging plug-in from the CDT update site.
Check/set the global tools paths
If you already installed the toolchain (and, on Windows, the build tools) in the default locations, as suggested in the above steps, the plug-ins might have automatically discovered them.
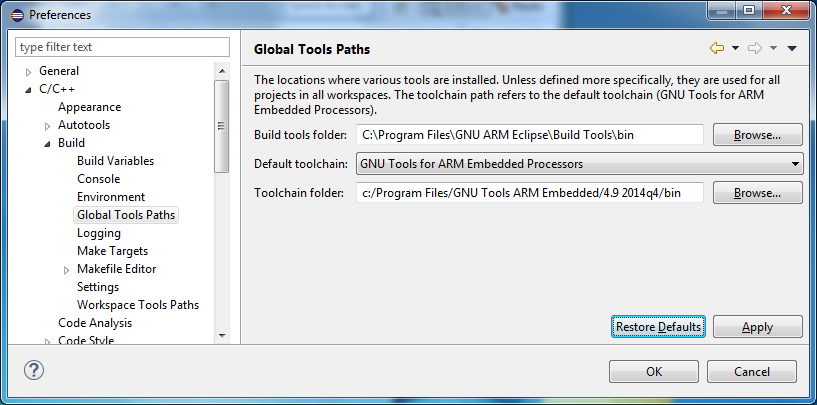
The above definition will make the toolchain and build tools accessible to all projects in all workspaces.
If needed, you can define different paths per workspace (Workspace Tools Paths) or even per project (Tools Paths in the project properties).
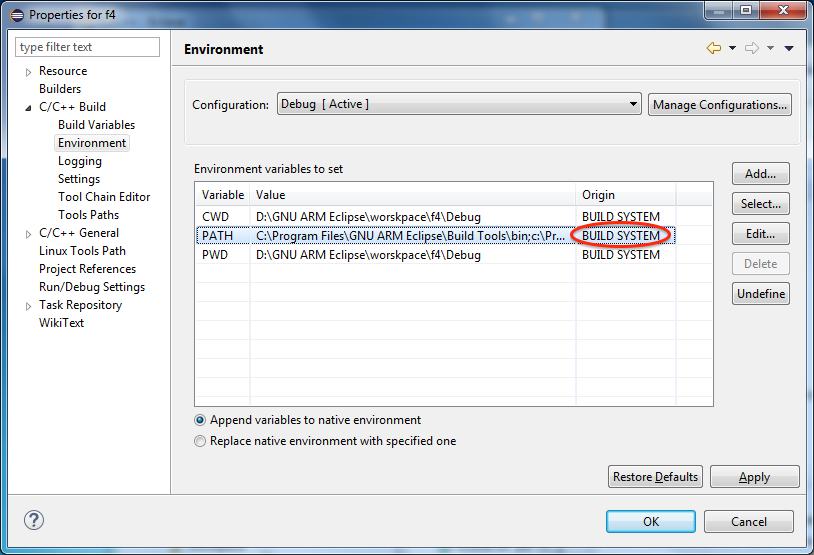
To check if the paths definitions are effective, go to the project properties page and identify the PATH variable. Be sure the Origin column reads BUILD SYSTEM; if you manually edit it, the Origin will change and will read USER, but this is totally not recommended, since manually editing the path disables further automated updates of the path.
Troubleshooting
Java security problems
- if you use the Oracle JDK, starting with mid January, attempts to install from SourceForge fail with handshake_error. Install the Java Cryptography Extension (JCE) Unlimited Strength Jurisdiction Policy Files and retry to install the plug-ins.
- if you are behind a firewall, older Java virtual machines fail to connect to SourceForge. Install the latest JDK and retry to install the plug-ins.
SourceForge problems
Note: starting with version v4.1.1, the SourceForge server is no longer actively used, so this problem should no longer be actual.
There are cases when the on-line access to the SourceForge mirror servers might not be reliable. In these cases the Eclipse update system may fail. For example:
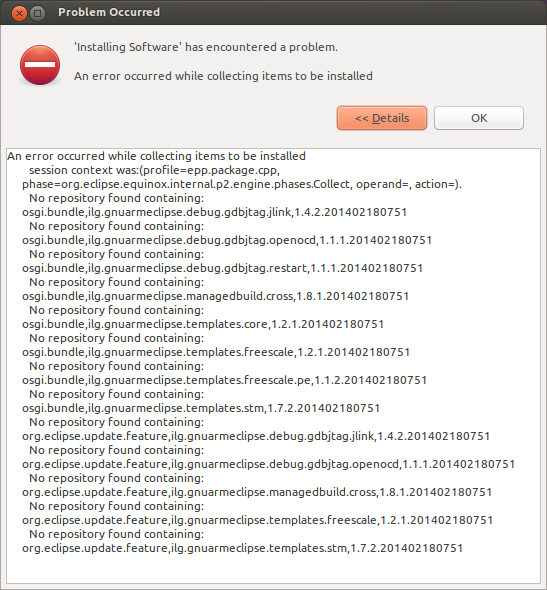
If this happens, Eclipse remains in a confused state and rarely can recover itself.
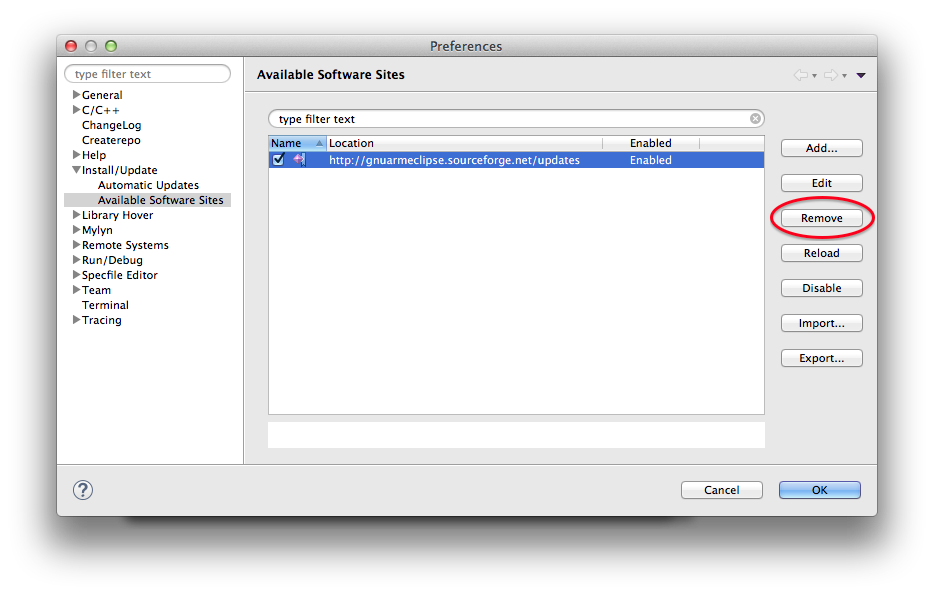
The workaround is to remove the Eclipse Embedded CDT update site from the available sites, restart Eclipse and add it again.
For this go to Eclipse menu → (Window →) Preferences → Install/Update → Available Software Sites:
If this still fails, the alternative method is to manually download the latest version archive and to perform the install from it, as presented below.
Incomplete Eclipse
If Eclipse complains that some required items could not be found, most probably you are trying to install the plug-ins on an older Eclipse, or on another Eclipse package than the recommended Eclipse IDE for C/C++ Developers.
Cannot complete the install because one or more required items could not be found.
  Software being installed: GNU ARM C/C++ J-Link Debugging 4.1.1.201606210758 (ilg.gnuarmeclipse.debug.gdbjtag.jlink.feature.group 4.1.1.201606210758)
  Missing requirement: GNU ARM C/C++ Core 3.1.1.201606210758 (ilg.gnuarmeclipse.core 3.1.1.201606210758) requires 'bundle org.eclipse.cdt 8.6.0' but it could not be found
  Cannot satisfy dependency:
    From: GNU ARM C/C++ J-Link Debugging 4.1.1.201606210758 (ilg.gnuarmeclipse.debug.gdbjtag.jlink 4.1.1.201606210758)
    To: bundle ilg.gnuarmeclipse.core 0.0.0
  Cannot satisfy dependency:
    From: GNU ARM C/C++ J-Link Debugging 4.1.1.201606210758 (ilg.gnuarmeclipse.debug.gdbjtag.jlink.feature.group 4.1.1.201606210758)
    To: ilg.gnuarmeclipse.debug.gdbjtag.jlink [4.1.1.201606210758]
Reinstall the correct Eclipse package, or add CDT to the existing Eclipse (Programming Languages → C/C++ Development Tools).
Ubuntu GTK issue
Eclipse is incompatible with the GTK version 3 distributed with Ubuntu (confirmed even with Ubuntu 16LTS). To overcome this, disable the use of GTK 3, by adding the following line to your environment:
$ export SWT_GTK3=0
If, for any reason, a global setting is not possible, the GTK version can be set in eclipse.ini:
--launcher.GTK_version
2
You might need to place this definition before:
--launcher.appendVmargs
This requirement is anecdotal and appears on some forums; the Eclipse documentation does not mention it.
macOS com.apple.quarantine
On macOS Sierra and later, unsigned applications are marked as quarantined and subject to a path randomization, which prevents Eclipse to maintain persistent preferences (for more details see blog post). To disable this, remove the com.apple.quarantine extended attribute from Eclipse.app:
$ xattr Eclipse.app
com.apple.quarantine
$ xattr -d com.apple.quarantine Eclipse.app
Plug-ins versions
One of the confusing details of the Eclipse Embedded CDT plug-ins versioning system is matching the version from the release announcement (for example Version 2.6.1-201502281154 released) with existing plug-ins/features.
The short answer is that the announced version refers to the update site, also packed as an archive, and available from SourceForge. The same version is also used for the ilg.gnuarmeclipse.core plug-in:
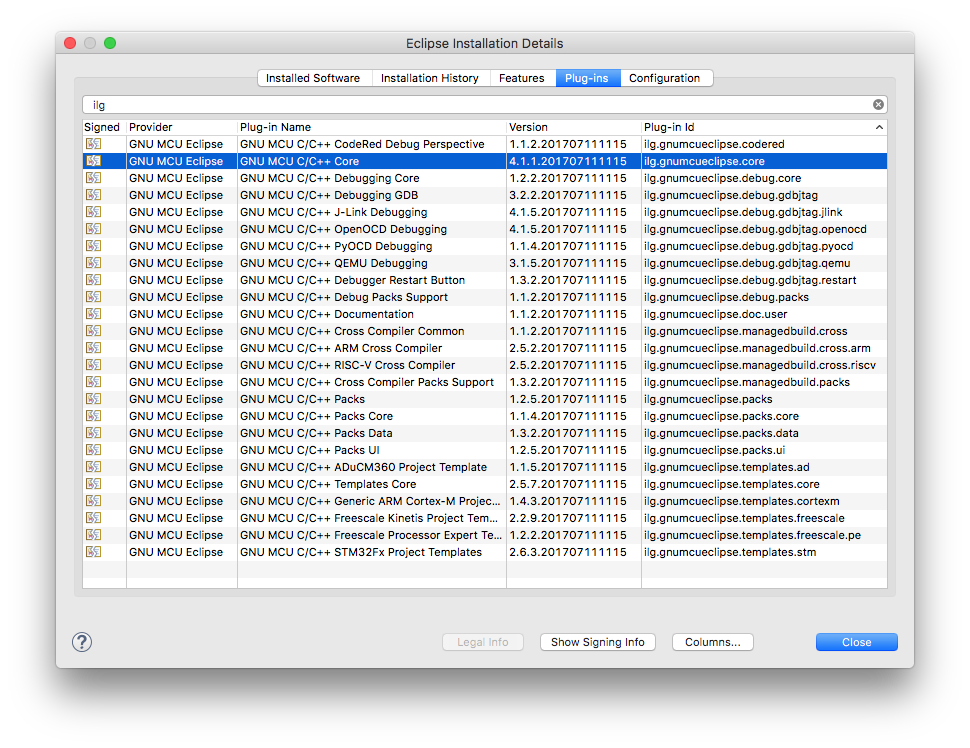
Although the core plug-in is referred by all features, this version number cannot be found in the list of the features:
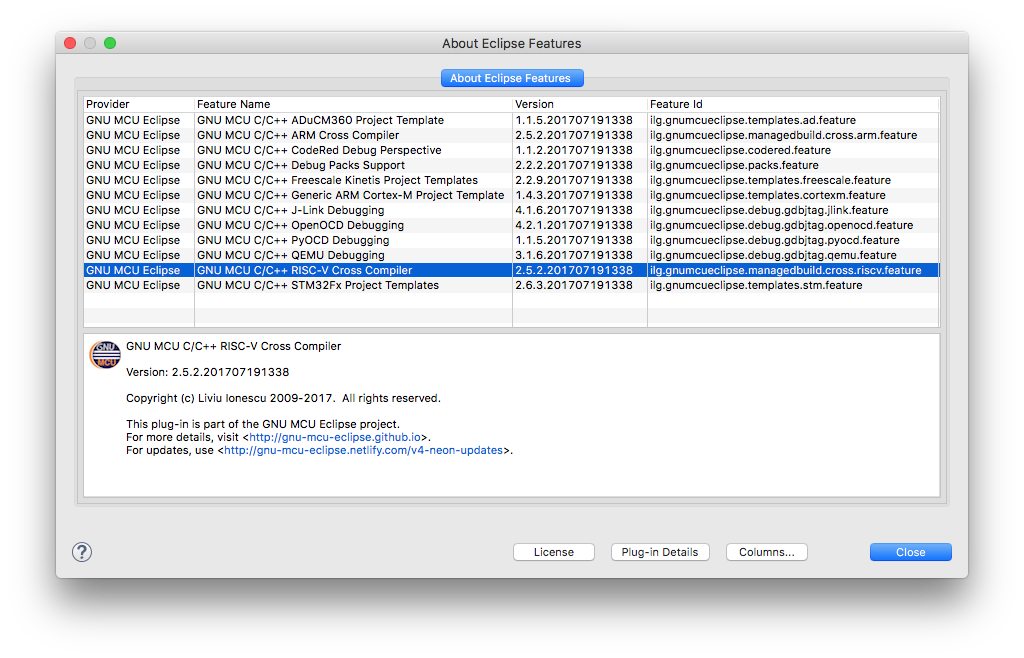
However, the common point for all these magic numbers is the release date, 201707191338 in this case, which is identical for all plug-ins and features.
Thus, the recommended method to identify plug-ins and features is by date, not by version, which differs from object to object.
Set workspace preferences
After completing the installation of the plug-ins it is recommended to set the workspace preference.
Download CMSIS Packs
Although support for CMSIS Packs is still experimental, the content of the packs can be used populate the Peripheral registers views during debug sessions, so it is recommended to install the packs for the processors in use.
For this follow the steps in the Packs manager page.
Toolchain and debugging support
By completing the above steps, the Eclipse environment is ready, and you can start creating projects right away. However, for being able to build and debug these projects, you also need to install:
- the toolchain
- the optional build tools (if you are running on Windows)
- the debugging tools
It is also highly recommended to install the Packs plug-in, to switch to the Packs perspective and using the Packs manager to install the packages related to the devices in use. Even if Packs support is not complete yet, you still can benefit from the existing CMSIS Packs, for example by using the peripherals registers view in debug, the documentation view in the C/C++ perspective, etc.
Test project
Follow the above steps and when everything is ready, proceed to create and build a test project.
Support
If you encountered any problems when installing the plug-ins, pleas refer to the Support page and do not send private email.
